Thursday, December 25, 2025

PostCurious - Ministry of Lost Things - Case 1: Lint Condition

 It’s been a while since I’ve had the brain power and concentration to be able to puzzle, but I have a nice quiet Christmas today, and a backlog of puzzle presents that I’ve purchased for myself this year, and possibly from before. I’ve got my tea, my cinnamon rolls, and starting with PostCurious’ Ministry of Lost Things, Case 1: Lint Condition, which bills itself as buying for 2-3 hours. I can already tell you it takes longer than that when there’s a cat happily sat upon your notebook and puzzle pieces, demanding more Christmas treats before she allows you access again to your puzzle. 

The box opens with a note, explaining the world  you have found yourself in - gneesters rehoming lost and forgotten objects to the elusiverse, and sometimes mistakenly taking important items. You’re told to log into a website, then open the first ‘transmission’. I was a bit annoyed that there was an online component - I wanted a decidedly analog holiday - but the use really does just seem to be for submitting answers and checking them. 

Sunday, June 1, 2025

The Detective Society - The Cursed Exhibition - Envelope 6

It’s the final night of my friend’s visit, and the final chapter of our escapade into the Cursed Exhibition. We are ready to save the world, destroy the artefact, and become world-famous Cult-Enders. We dig in to both delicious dinner and the final envelope.

Envelope 6 contains the standard ‘start here’ envelope; a letter from the detective; another police letter with known suspects; a partial map of Istanbul (not Constantinople); four case files from the Turkish police. 

We are told we must track down four keys, possibly by solving four murders, though the Cult may already have the keys. The Turkish police have identified a list of possible suspects, as well as provided us the case files. We need to determine:

  • Which of the suspects is the murderer?
  • Where is location of the hidden shrine? 
After perusing some online resources, we start with the case files: 
  • Case file 9G4T, which provides us a photo, an incident report, a hair follicle, and an overdue library report. The police file contains an audio clip, suggesting that there is more to the library than meets the eye, also that the Librarian expected someone to come after him. Looking at the hair, based on the available information, it would appear to be medium to light brown hair, eliminating several suspects, at least for this murder. The photo is of an Arabic character, T. Looking at the library letter, we find some overdue books, and a link to another website. First, there are a series of suggestions in the returned books, but not clear what to do with them at the moment. 
  • Case Number: 4M8R. Something was stolen from a bank vault, with another photo and voice note. The photo is an Arabic M. There was a note left on the deceased’s desk and basic info regarding the deceased. The note suggests there are six characters, an underscore, then five characters. ******_*****. This time, on the audio file, my eagle-eared detective pal picks up that it’s morse code - Daughter. Her daughter’s name is not provided, but she was born in Izmir. We try accessing her staff website, but don’t have enough information. 
  • Case Number: 1A8Y - a death in an antiques shop. The police report provides information on the scene, including a shoe print, a voice note, and the Arabic G or , depending on if a dot was intended, as well as a list of antiquities and a receipt, which would allow us to backwards math a missing item - a tankard. There is also an audio file, which hints at additional clues beyond the key. We then contact the police regarding the tankard, which sends us to a spinning wheel, to a clock, to a camera, which gives us a clue for later: The third oldest key cannot be turned immediately before. We also get the shoe size - 25 cm - which rules it down to someone wearing an EU 40/UK6.5/US7 - we are down to 3 suspects (maybe 4 if I did the hair math wrong). 
  • Case 3F3T: A dead ornithologist with a rifled study. This time we have fingerprints, another audio file, pages from the ornithologist’s book, and another photo - this time of the Arabic S. The bloody handprint on the knife suggests left handed, which narrows it down to two suspects. We need to go back to the other files, probably the bank one, to figure out the eye color, which would allow us to finalize the choice. The audio message suggests that the phrase portion of this case is hidden in the life’s work. I do appreciate that the ornithologist’s name is ‘birb’. If we overlay the bookmark on the book’s shaded areas, we get the following phrase: The purple key must not be turned.
Realizing what we may have missed on the first couple, we go back. 
  • Case Number: 4M8R. So far we know was stolen from a bank vault, leaving an Arabic M.The note suggests there are six characters, an underscore, then five characters. ******_*****. Daughter was the morse message. Her daughter’s name is not provided, but she was born in Izmir. What we missed the first time was that we were supposed to email Fatma, get her OOO, and her daughter’s name. With that, we have Name_Izmir, which gets us in! Using the timing of the heist, we determine the suspect has blue eyes, giving us ONE suspect remaining! We also get When the blue has already been turned, or when the red has not been turned. Now we feel this case has given us what it can.  
  • Case file 9G4T gave us T, light brown hair, but no passphrase, but we know there are things in the returned books which have funny names. We missed that on the back of the letter, there was a note with a call number - a book written in 2008, starting with O, on the subject of genealogy, names, and insignia. There is a book titled Or after the Youngest or the Oldest, which should round out our clues. 
We still don’t know WHERE the keys are. Google tells us that the main point in Istanbul that uses those Arabic letters is the Grand Bazaar. We email the detective the location and wait for a response. NOPE. We get a hint, and take a look at the locations the murders occurred - they’re clustered. With a bit of a nudge we find the letters on the streets, circling one of the locations on the maps. We send the location to the detective, and are correct! She finds the hidden entrance, and uses the murderer’s name to get past the guard. We get to listen in on her trip to the shrine, where she is confronted by the security guard from the cult’s HQ in London. We then have to help her hide, and take out the guards looking for her without being caught. The sound effects are amusing. 

We then have a 20 minute STRESSFUL window to solve multiple logic puzzles. I don’t work well under pressure. Thankfully, we solve them, she destroys the artefact, and the world is saved from the ravages of the Cult of Shakir. Well done! We get a series of conclusion emails and video, and kittens! 

Beyond a few glitches, we had a great time doing the entire series. I would have preferred less reliance on the web, as that can be hard when you have multiple people trying to enjoy simultaneously, but really great job overall. This copy of The Cursed Exhibition is going to my friend’s house for her wider family to play, but I highly recommend heading over to The Detective Society and picking up your copy today :) 

Saturday, May 31, 2025

Morrison Game Factory

 My copy of PostCurious' new puzzle tale, The Morrison Game Factory, just arrived, and I'm super excited. I haven't even gotten it home yet and I've already started to dig into it. 

It's a bright and cheerful teal box and even before opening it I noticed there was an interesting pattern on the cover. The dice and little rocket tokens translate into a short, slightly worrying sentence:

... . .-.. .--.  -- . HELP ME

An opening letter, sent 'One Adventurer to Another,' tells us that someone found this box, pristine, on the conveyor belt of an abandoned game factory. It directs us to a folder titled 3428, which turns out to be the maintenance record of the machines at the Morrison Game Company, now defunct. The log lays out the story of a machine, 3428, that apparently achieves sentience. The singularity is now. Except that the maintenance guy, TY, didn't take kindly to the machine's new behavior, and kept resetting it, despite the damage to the 'machine learning process.' Jerk. 

The Detective Society - The Cursed Exhibition - Envelope 5

After last night’s stunning cliffhanger, we wrap up a day of touristing with another exciting chapter of… The Cursed Exhibition! Having napped, enjoyed an appropriate beverage, and ensured that our feline friends are cheerfully engaged with the envelope packaging, we dig in.

This envelope has a lot of components floating free. We have the standard square envelope and clue card; four photos; a letter from the police; a membership card to the Cult; a location fragment; an electric bill for “Ms. Cult”; a number of potential key ends; and an unmarked manilla envelope. 

The envelope contains a package, smuggled out of her cell. We get a letter from the detective, as well as a map, a security manual, and some colored overlays that may be related to the cell. She tells us she has a contact in the next cell over who will help her if she helps him figure out the correct key. The photos are of messages scrawled on furniture and walls in her cell. One of them suggests that we should look at triangles not circles, others suggest we should read all phrases backwards, so circles not triangles. There are both triangles and circles under the letters of a third message. A fourth questions the ability of the security chief to actually investigate potential members and says he doesn’t read weird letters or numbers. We also get the security manual for the cult. They include references to Indiana Jones and Home Alone - top notch security indeed. 

First, though, we need to sort out the key situation. We contact her ‘live’ via a ‘secure police channel’. We realize that the keys are tied to the electricity usages of the various rooms. We identify which room is their holding cell, and find the key that has the same electrical use pattern tied to its tines. Her neighbor is free! Using mirrors, we see that she’s in room 19 or 16. This is trickier, for while we can discard the key that got her neighbor out, the same pattern doesn’t seem to work for her own cell. 

When we look at hints, we realize we started in the wrong place. We were supposed to hack the computer using the ID card first. But we don’t have a pin yet. The portal requests a name and pin. We have the name, but the pin? Presumably on the walls. After a bit of poking, we get a message “Read Every Fifth Word” then apply it to another message, getting our hint to the pin. Once in, there is a helpful ‘cell finder’. Each cell has a map of the lock pins for the key. So much easier than our approach, which may not have actually been an intentional solve… With that in mind, we set her free, but she won’t leave without the blasted artefact. 

We assume that they would have moved the artefact from room 7, where it was last time, and there is no energy spike in that particular room at any time over the last few days. Still, we check with the detective. Then we read through some amusing chat groups, allowing us to rule out several of the electrical spikes. We learn that you are never more than 10 feet away from a spider, which is why I keep cats to protect me. We also find another location fragment, for use later. Based on the conversations, we know that it’s in the NW quadrant, and only one of those rooms had a power spike. We tell her to go there. We work her through the maze, having her drop into an unguarded room. Woot! 

There is, however, a keypad in our way. Thankfully she has a UV light with her to see the prints on the keys :) Which spell the name of the cult. Of course. We guide her to the room, and with the help of some mirrors (how does she block three lasers with two hands?) gets access to the artefact. Which of course triggers the security to move the booby traps, for a different way back. We begin. 

Once we get her out, with the artefact no less, she realizes we must destroy it (IT BELONGS IN A MUSEUM!). To destroy it, she needs another key, which we must piece together from various squiggles - coast lines and borders - and identify the key’s location. This is where having a geographer friend comes in VERY handy. Also, tracing paper. We identify the country and send a message off to the detective. And wait… And wait… There seems to be a glitch, and I did find the other artefact email in my spam. My friend’s account works, and we get a voice note from the detective, telling us we were correct, and that’s she’s on her way to get the final bits of the keys and artefact to end a centuries-long cycle of violence! 

VICTORY!

Friday, May 30, 2025

The Detective Society - The Cursed Exhibition - Envelope 4


 Following a longer than anticipated Envelope 3, we dive right into Envelope 4, following a message from the Detective that she was going to infiltrate the Children of Shakir Cult in London. Within envelope 4, we have: The beginning envelope; a note from the detective; a coroner’s report for one Kay Hiddleston; a book with the same emblem as the cult, labeled KH; a car park map; an as yet unknown map. 

The detective looped in her boss, and the local police don’t have the resources. The Detective is going to infiltrate the cult. She will pose as Kay Hiddleston, tragically killed in an accident a few days ago. We must provide the detective information regarding the regalia - what K would have worn to the conclave - and text it to her immediately. 

Based on the notebook, Kay is a level one member, which indicates she would wear:

  • A pointy hat without band or star
  • Grey cloak (at the dry cleaners)
  • Red tunic
A tabby cat clearly unimpressed with his humans’ ability to solve puzzles Hopefully we don’t get the police officer killed… She is able to pick up the regalia from the dry cleaners with our help. We then have to help her find the entrance to the meeting space. She thinks the entrance might be in one of the car parks, but it’s not clear how we were supposed to get to the correct one. We guess based on where Eddie used to work - two of his former employers are here, as is his coffee shop. We are then supposed to help her find the place. We are STUMPED - UNTIL! My puzzling companion realizes the roundabouts in the parking lot map line up with the emblem on the back of the notebook, which highlights a specific square or parking space. There is a car in that space and we have a picture of the interior. This is where the odd numbering of the pages come in - they are the directions to moving the stick shift. That opens a secret passage to the Cult’s hideout. We direct the Detective around the hideout, making the appropriate greetings to other cultists on the way, based on the notebook. Also, the creators of this puzzle are apparently Warhammer nerds. Having made our way through conversations, and confirming the Cult has the artefact, we are faced with a new challenge: turning on the fuses.

This requires turning the fuses on based on a north-south alignment. Thankfully there are clues scattered throughout the conversation, allowing us to sort the order pretty easily. Less easy is getting the info to the detective, who doesn’t like my capitalization in texts. Old pre-AI tech, but still fun. Having turned the power back on, we try again to talk to some of the other members to try to find the secret room where the artefact is hidden. The first office we try does give us more clues as to the location - people really need better passwords. Then we need to look at some paintings, when I learn that the picture of Napoleon on a Horse is “Napoleon Crossing the Alps”. We eventually find the door to the secret room holding the artefact. However, we need a code. We email another account, and are linked to a website. The first passcode is provided in the notebook. The others potentially rely on a voice message broken up. Once we get those in order, we are presented with a combo lock. We listen carefully and identify the combination through a series of clicks. 

The final audio clip discusses the methods of the Children of Shakir ‘protecting’ the artefact by killing people. A game of ‘cat and mouse’ for hundreds of years. Apparently the artefact is back in their care, and they have plans to hold the police officer until they can move her to Manchester for an untimely demise. The artefact will be reunited with the ‘four keys’ for an ‘eternal legacy’. What could possibly go wrong? For now, we have successfully completed Envelope 4, despite my cats’ best efforts. Sleep 


Thursday, May 29, 2025

The Detective Society - The Cursed Exhibition - Envelope 3

We begin night three without many leads as to what happened to the Artefact, and what has led to the death of the Archivist, the Curator, and now Eddie Moore. All we know, is that there is an unknown person in a trench-coat lurking about in the eaves. We begin! 

Tonight’s envelope has the standard start here square, a letter from the detective, a kraft paper envelope addressed to Mr. Eddie Moore, an envelope from the University of Greater Wellington, and a manila envelope labeled ‘Do Not Bend’. 

A tabby cat sleeps nest to puzzle materials
The starter asks for Mr. Moore’s motivation, to explain, eventually, the motive for his own untimely demise. Apparently the envelopes are from Eddie’s apartment, and the police have already cracked his laptop, and we are advised to contact her at our earliest convenience. No files from the computer, only a website link we think Eddie was trying to access. We are cautioned to ensure we have all the info before attempting the website ourselves. Its homepage is a very secret order vibe emblem with interconnected shapes and odd letters. 

We begin with the kraft envelope, addressed to Eddie at the museum. It is from one Scarlet Rob, who asks we WhatsApp her when we have our next clue. We need find the luggage label number of a trunk belonging to Birdie Shepperton, who died before docking in NY. She may have been an antiquities thief. We’re given two photos with numbers and a website. The website contains photos of a list of thefts from the time around Birdie’s travel from England to the U.S. We suspect, given her name, that at least four of the unknown perpetrator thefts can be attributed to her, as symbols of birds were left nearby. In order to identify her trunk number, we must figure out where she departed the UK. THANKFULLY my partner likes maps ;) We identify that some trunks stay on board, others are on and off at each stop. Based on what we were able to identify, her last theft was Oxford, and our options are (in order) Newcastle, Southampton, Liverpool, and Belfast before the crossing to New York. Based on distance, the closest port to her last theft was Southampton, at 65 miles from Oxford. That means that her trunk loaded at Southampton and stayed for the others. The only trunk that does that is 7927. That the ship left in May confirms why none of the thefts on the last page have her ‘signature’ - they were after her boarding the ship. 

A quick text of the luggage number to Scarlet confirms our investigation. She then sends us a list of unclaimed luggage, Birdie being dead at the point and unable to claim it - we need to identify the correct trunk using the ‘Unclaimed Luggage Rules’ on one of the images. But first, DINNER! 

Wednesday, May 28, 2025

The Detective Society - The Cursed Exhibition - Episode 2

The scene: the dining table

The weapons of choice: wine, olives, potato chips. Probably all covered in cat hair. 

A handsome tabby cat reclines on top of puzzle supplies

We are ready to dive into tonight’s envelope! Perhaps we shall discover Claudia’s murderer, possibly that of the Curator, or what Eddy was *REALLY* doing that night, skulking around the museum. 

We Open the Envelope! This time, the envelope contains a letter from the police, a police evidence envelope, and the standard square ‘start here’ envelope. We are helping Police Officer D.S. Higgins with the investigation. Now we have video proof it WAS Eddy! Yes! Eddy is now in hiding, we have the contents of his locker, and we don’t know which address is currently his, nor do we know his current alias. 

The evidence folder contains a black wallet, made of ‘phizenbao’ leather. No money, a picture of an unknown woman with a date on the back - 20/08/02. There’s a hangman puzzle on the back. There’s also a betting slip, betting on Oscars in 2021 - we notice that Eddie’s aliases are also related to actors. There’s a code and site for a dating service. Also a members card for a coffee shop - Sir Frothalot (I like large lattes and I cannot lie). As well, his staff id card with medical information - no bees please. There’s also a tram map for the city of Manchester. 

His locker also contains information regarding accessing his dating profile - we’ll need to recover his account at some point. We may also need to log onto his Coffee website, which will need his address, as requested by the police officer. He boarded a tram post coffee purchase. Apparently he took a weird tram path, which we will have to map out. Going through his bio, we realize we need to identify the following:

  • When did ‘Believe’ win the Eurovision - May 2008
  • When Djokovic won his third Wimbledon title. - 12 July 2015
When we email his prior employers, they do ask for confirmation of when he left their employ. The hotel provides us with a list of potential names, including two with famous last names - Cruise and Cotillard. We hypothesize he may be alternating genders for the last name, then realize he’s stealing the first name of the male best actor for the oscars of the year he changed jobs, and then the female best actress’ last name. We test our theory:
  • In 2015, when he joined the Myth museum, the winners were Eddie Murphy and Julianne Moore —> Eddie Moore
  • In 2008, when he joined the Hotel, the winners were Daniel Day Lewis and Marion Cotillard, allowing us to narrow the list down to Daniel Cotillard.
  • In 2003, it was too early so he went by the 2002 names, which were Halle Berry and Denzel Washington - Denzel Berry
  • He started then at Smithsonian in 1999 as Roberto Paltrow, when the winners were Roberto Benigni and Gwyneth Paltrow.
So, we know his aliases, and this is supposed to take place in 2021 (?) which gives us Anthony McDormand as our likely name he’s going under now. 

We try the dating site. Using the photo reference, we figure out who he went out with, and start messaging. We then have to solve the hangman to figure out her favorite food. After chatting, she gives us Eddie’s then-address: 21 Nona Street. From there, we try to access his coffee account. 

First, turns out the address is real, and closest to Langworthy and Wiest tram stops. Looking at the coffee store, it’s not clear what the nearest one would be. However, my puzzling companion emailed the possible address to the police officer, who called the landlord there, and let us listen in. The message tells us Eddie moved out of Nona street a few years ago, ghosting the landlord. 

So that wouldn’t be the nearest coffee store for him. So, we have to use the Manchester Transport network and backsolve his path. OR, we can guess which stop is nearest to him based on which coffee shops are in Zone 1. There has to be a way to backsolve, but we’re getting testy. We should probably eat dinner. Turns out Princess Street is near St. Peter’s square as well. So, we get into his coffee account, which gives us another address for him, which we send to the detective. Sadly the current tenant doesn’t know where he is either, and we are apparently behind the trail of someone else looking for Mr. Moore. 

We need to find another address. I email his coffee shop, to no avail, but it does say that they are processing his new address in 7-19 business days. We tell the officer that the coffee shop has it - no luck. We realize we can still ask the prior employers, now that we know his alias at the time. The hotel does give us another address! We get to listen as the police break into his apartment! Oh no, he’s dead, and the artefact is missing! Another curse! But we won - without hints or crying, or too much cat hair. 

We tested the theory, realizing that you can solve all three addresses in any order, whichever the last one you send in is the murder scene. VICTORY!

Tuesday, May 27, 2025

The Detective Society - The Cursed Exhibition - Envelope 1

 As part of my recent Kickstarter backing of Murder on the Moon by The Detective Society, I also picked up their entire back catalog. I have a friend in town visiting who’ll tolerate my insanity, and contribute to it, so we are diving into the Cursed Exhibition Collection.

Envelope 1 opens to three envelops, and a clue card - which we are going to ignore hopefully not needing them. One of the envelopes is helpfully marked start your investigation here, the other two have City of Manchester Police on them. One is marked Evidence. We begin!

The start envelope includes a note to us, the National Museum of Legends and Mythology needs our help! There is a strange artefact - MISSING!! An archivist is dead! The curator needs our help! The police are useless so it is up to our brilliance to solve! 

After realizing this may have been a returned item with all the tape and some of the envelopes opened prior, we start with the larger envelope. There are a map/activity pack and STICKERS, two letters, and a padlocked envelope, as well as some evidence logs.  The stickers say to mark 8 of our most interesting sites on the map, but you know I’m going to use post its, and save the cool stickers for my journal. #I’manadultdamnit.

We are directed to a short video from the Curator, one Angus Phillips, who cares far more about the artefact than the murderer of Archivist Claudia Cobb. Different actor from those in the kids series, but well delivered. 

We then open the evidence-Thames item 03093. It contains an artefact cleaning cloth (which will become my glass cleaner post this game), a branded pencil, a slightly sticky measuring tape, and a series of evidence photos showing some of the items in situ. There is also a note from the police, detailing the chief officer’s. He said there was also a mug of water and a mobile phone. I now want to put EVERYTHING into a mug of water. Maybe not the mobile phone. 

With the papers for the artefact info, we have a letter from an antiquities expert, Jeremiah Picklesworth,  telling us that the artefact is CURSED! The Museum must be warned! He claims the artefact is responsible for the death of his wife, Belinda Picklesworth, and that he donated it to another museum which he claimed also had bad things happen to them. As my puzzling companion pointed out, the artefact clearly has a gender bias. 

We recreate the curator’s desk, with much amusement from the cats, using the evidence photos. Nothing is immediately illuminating. However, we do notice that one evidence photos is sticky, possibly from contact with the sticky tape measure. The mug of water is not visible in the evidence photos. We hypothesize that the approximately 40 inches created by the loop may be the size of the artefact. 

Having recreated the crime scene, we go back to the maps and stickers and such. We know we have the security logs and need to both find the code for the bag as well as interview the security guards. We carefully read the brochure. We then identify a couple of related websites. Using the website and info from the brochure, we catch all of the stickers (post its because they’re too cute). We then dig out my CLUE tokens to track movements from the evidence sheet.

20+ minutes later, we realize we’ve jumped the gun, and go back to the drawing board on her desk. And stare. And stare some more. And then give up and get hints. Then bang our heads at the solution, which is persnickety and requires some squinting. We then take a break for dinner. While banging our heads more.

Monday, May 5, 2025

The Detective Society - Family Adventures

 It’s been a bit of a crazy while, but I finally have the bandwidth to try out the three mini-adventures that came as part of The Detective Society’s Murder on the Moon Kickstarter. I’m actually not the first to play these individual copies. They’re labeled as ‘Family Adventures’ so I shared them with colleagues with kids to hopefully lessen some of the stress of this Administration’s attack on Democracy, Rule of Law, and General Decency. Yes. Capitalized. They’re important. And I could use some stress relief as well, so settling in with some Thai takeout and the puzzles with the window open to the breeze.

The Missing Potion

The first of the three adventures, the Missing Potion comes with cards of two sizes - slightly larger than index cards, and some the size of playing cards or Clue cards in a small envelope, with suspect body bits. Kind of like Guess who? One of the index cards tells me that we are off to help the Blink Workshop, and sends me to a video to watch. Super cute video with an actor very much into the making this exciting for kids role. I get slightly distracted by the tracery maple leaf (?) on the back wall. I already appreciate the energy, time to send Dr. Errol (presumably a nod to the Cryptex Hunt creator?) a message about his missing Invisibility Potion (clearly stolen by SeeMe labs). The link sends me to a chat room. First, I confirm that SeeMe Labs is probably behind the theft. Then I need to determine who at Blink Workshop helped. There are four suspects, one of whom I immediately suspect because she looks familiar from somewhere else. Another game? Amusingly, it turns out to be her - Sam Jenkins. I need to Google Image Search her later to figure out where she’s from. I figured out it’s her based on a series of helpful emails between her and “Rand Omman“ (Random Man) - the perfidious fiend stole her cat so of course she’s entirely justified in stealing the potion to get the cat back. 100% support her decision on this. 

From there we need to log in to her Blink account, but, oh no! We don’t know her password! Thankfully we have security footage and a hint about ‘any old shape’. Pictures from the security footage are on the index cards. The idea is that you color in the areas that are different between before and after shots. Thankfully it’s pretty obvious that the areas create a STAR. Wonder of wonders, that’s her password! We’re in! Following the clues to a grocery list with a helpfully laid out key - refer to the email dates and find specific line/word combinations. Was I not supposed to look at the emails before? Hmmm. Anyhow, the message we get reads: Tell Errol Look In Desk. Roger, on it! 

The desk leads us to a series of descriptors to put the suspect cards together. The cards were super slippery so washi came in handy. Build the three suspects and you get a message. Oh no! SeeMe Labs Has Built Your Machine! Also, the bearded guy’s code name is Eiffel Tower. He is French? Also, I thought it was a potion that was missing? 

Ok, it’s a “potion tracking machine”… For the next bit we need the last index card. Following the pattern of numbers and colors, we get values and letters for Voltage, Temperature, and Ph. And the mythical tracking code: 1NV1S1BL3. Yep, this puzzle speaks l33t. It’s also code name Big Ben. Lots of towers - subconscious phallic energy? lol. 

This leads us to another clue from Sam, a bunch of photos on her desk. They’ve taken her to the odd one out, I.e. the only one that’s not a pointy object - the Roman Colosseum. Oh look, the Prof is in Rome too, and the police are here to help! We’ve solved the case, and there’s a super cute audio vignette at the end. 

Time Travel Trouble

The second of the adventures is Time Travel Trouble. It’s the same format - robust index cards paired with ephemera. In this case, that includes a letter home, a coin, a playing card, a sticky note, and a copy of the Family Guide to Creepy Crawlies. In this case, we’ve been contacted by the National Museum of Legends and Mystery (would totally visit) and their Curator G. Wells (surely not a relative of HG?). Same as before, a QR code takes us to a video file. A very Dr. Who vibe, Baron Timesteal (yes, that’s their name) has stolen things from the museum using a special clock but likes to play games so left us clues. Again, super cute acting and overdoing it for the kids. Loving it. The puzzle proceeds with the same ‘chat room’ approach as the first - enter answers to get the next response. 

First puzzle - use the sticky note and the guide to creepy crawlies to access Baron Timesteal’s login page on ‘superhackers’. Don’t click on strange links, kids! Also, don’t write down your login and password on the back of a sticky note, Mr. #hackingislife. I feel like I’m watching Hackers from the 90s and the bad guy is about to pop up on his skateboard with some nonsense. The landing page is about that level of ridiculousness. Loving it. Now we’ve got to the bugs. To deactivate the virus attacking the museum, we need to poke the bugs in order of the number of legs they have, helpfully spelled out in the creepy crawly guide. Click on the 80s style graphics and get an alphanumeric cipher (also hinted at on the sticky). Oh no! Baron Timesteal has stolen The Heart of the Internet!! Whatever shall we do? (Other than giggling, of course). 

We are next sent to the Mayan exhibit, with the clue to follow the weapons and stop on the kings. The figures are in groups of 3x3 so guessing they’ll form letters. Bone Club. Woot. 

Next to the Monarchy exhibit. We’re pointed to the coats of arms on the wall and the playing card. The note suggests one of the kings is missing something - one of them is without his crown. The shield labels have selectively bolded letters, taking only the ones from the shields with crowns we get: Glory Diamond. Sounds like a name Baron Timesteal might use in his side hustle as a stripper. But we move on.

We are sent to the letter and the coin, the final pieces. The coin has a square hole in the middle with the cardinal directions on it. The letter from Francis Drake has squares on it the precise size of the hole in the coin, and there are letters/directions on the reverse. Putting the coin on the squares and taking the direction from the back points at a series of words: I stole the Gold Spade. Presumably from digging up the City of Gold? 

The curator is convinced the Baron works at the museum. We must look at the staff and see. Who could it be? Looks like we’ll be doing anagrams - several of the names look Timesteal-y. The best thing is, having identified him, the Curator’s response is “of course it’s [them]. [They’re] such an idiot…” Lol. Again, there is a super cute audio clip at the end. I love it. Oh! But we’re not done! When do these artifacts go? Once you’ve browsed the website and found the correct dates, input them into the clock and get more cute clips. Plus, and I should see if the other did this as well, you can get a certificate for solving it once you’ve gotten all four placed safely. Very cute. 

The Smashed Piñata 

This is the last of the three, and from the feedback from the families that did it, maybe the hardest? Will see. Hmmm. No introductory QR code piece. Will need to check with the families. 

Saturday, March 22, 2025

Cryptex Hunt 2025 - Day 7

Guys, this might be the first time I actually complete a Cryptex Hunt! At least, that's my goal for today. I finished all of the intermediate puzzles last night, and vowed to actually sleep and tackle the meta today. Which, of course, I didn't do and peeked at the meta last night and started to try to undo the anagram, or at least I think it's an anagram? Couldn't make anything more than "Act Solved In KHURPJWMY" so went to sleep, or tried.  Now to this morning...

I should back up. The meta puzzle image is of an auditorium for a theater set up on a 10x10 grid with a divider in the center, so five columns either side. The flavor text is "The play is in order, the actors have rehearsed, now it's time to choose your seats for Romeo & Juliet". I see three parts - the 'order' of the play, the 'actors' and the 'seats'. 

As it's a meta-puzzle, I expect it to use some parts of the other puzzles, but there were 12, and there are only 10 lines here. In original puzzle order, the answers I have are:

  1. Blog: Friar’s Fumbles - CIMOLINO 
  2. Blog: Prop Hunt - WHITING
  3. Blog: Script Scribbles - STRIDE
  4. Blog: Spotlight on Blocking - ENOCH
  5. Blog: Table Read Chaos - HARVEY
  6. Cast & Crew - HOWARD
  7. Fridge Poetry Contest - GARDARSSON
  8. Instagram: Bouquet - BLOOM
  9. Instagram: Costume Party - BEYMER
  10. Instagram: Word Salad - OLIVIER
  11. Media - BEAN
  12. Quality Theatre Memes! - DICAPRIO

If I start with 'the play in order', I should rearrange these 12 into the ACT/SCENE order of Romeo & Juliet, based on the scenes used as the puzzle bases. That gets us: 
  1. Blog: Script Scribbles - STRIDE - Act 1 Scene 1
  2. Instagram: Bouquet - BLOOM - Act 1 Scene 4 - Going on a limb based on the Queen Mab reference. Everything else is other play names.
  3. Blog: Prop Hunt - WHITING - Act 1 Scene 5
  4. Instagram: Word Salad - OLIVIER - Act 2 Scene 2
  5. Cast & Crew - HOWARD - Act 2 Scene 3
  6. Blog: Spotlight on Blocking - ENOCH - Act 3 Scene 1
  7. Instagram: Costume Party - BEYMER - Act 3 Scene 2
  8. Blog: Table Read Chaos - HARVEY - Act 3 Scene 5
  9. Blog: Friar’s Fumbles - CIMOLINO - Act 4 Scene 1
  10. Media - BEAN - Act 4 Scene 3 - MAYBE. Based on the first direct R&J quote in the interview.
  11. Fridge Poetry Contest - GARDARSSON - Act 5 Scene 1 - Tricky as there are other quotes but using the first one)
  12. Quality Theatre Memes! - DICAPRIO - Act 5 Scene 3 - only scene directly quoted in the puzzle, also when everyone dies. 
Ok, so we have a new order. We still have too many answers. Taking the Scene number/letter doesn't seem to give us much, and none of the lines are able to make it up to 10 across either, with the exception of Gardarsson. So, looking at the actors. 

  1. (John) STRIDE - Act 1 Scene 1 - Played Romeo in 1960 across from Dame Judi Dench
  2. (Orlando) BLOOM - Act 1 Scene 4 - Played Romeo in 2014 (how did I miss this?!) across from Condola Rashad
  3. (Leonard) WHITING - Act 1 Scene 5 - Played Romeo in 1968 across from Olivia Hussey (the version we watched in HS). 
  4. OLIVIER - Act 2 Scene 2 - Tricky. Laurence Olivier was the narrator and Lord Montague in the 1968 version. No listing of him anywhere as playing Romeo directly.
  5. (Leslie) HOWARD - Act 2 Scene 3 - Played Romeo in 1936 across from Norma Shearer
  6. (Alfred) ENOCH - Act 3 Scene 1 - Played Romeo in 2021 on stage across from Rebekah Murrell
  7. (Richard) BEYMER - Act 3 Scene 2 - Played Tony in West Side Story (R&J plus snapping and cigarettes) across from Natalie Wood as Maria
  8. (Laurence) HARVEY - Act 3 Scene 5 - Played Romeo in 1954 across from Susan Shentall
  9. (Antoni) CIMOLINO - Act 4 Scene 1 - played Romeo in 1993 across from Megan Follows as Juliet (Anne of Green Gables!!!)
  10. (Sean) BEAN - Act 4 Scene 3 - Played on stage in 1986 across from Niamh Cusack (because Sean Bean always dies in every production)
  11. (Gisli Orn) GARDARSSON - Act 5 Scene 1 - Acted and Directed across from Nina Dogg Filippusdottir at the circus.
  12. (Leonardo) DICAPRIO - Act 5 Scene 3 - Played Romeo in 1996 across from Claire Danes
Again, we're stuck with a seating chart numbers 00 to 99, 10 across. My first instinct is to try to stack them across - JOHNSTRIDE is 10 letters, but ORLANDOBLOOM is definitely not. Neither is JUDIDENCH, if I were to be looking at the Juliets instead. JOHNJUDI is also not 10. 

Time for a small hint. Hint #1 is are the names familiar - yes... Hint #2: In this context, Juliet isn’t important.

On behalf of all women: RUDE. So, if who they played against isn't important, maybe when? It does say the play is in order. 

  1. (Leslie) HOWARD - Act 2 Scene 3 - Played Romeo in 1936 
  2. (Laurence) HARVEY - Act 3 Scene 5 - Played Romeo in 1954
  3. (John) STRIDE - Act 1 Scene 1 - Played Romeo in 1960 
  4. (Richard) BEYMER - Act 3 Scene 2 - Played Tony in West Side Story in 1961
  5. (Leonard) WHITING - Act 1 Scene 5 - Played Romeo in 1968
  6. OLIVIER - Act 2 Scene 2 - Tricky. Laurence Olivier was the narrator and Lord Montague in the 1968 version. 
  7. (Sean) BEAN - Act 4 Scene 3 - Played on stage in 1986 
  8. (Antoni) CIMOLINO - Act 4 Scene 1 - played Romeo in 1993 
  9. (Leonardo) DICAPRIO - Act 5 Scene 3 - Played Romeo in 1996 
  10. (Gisli Orn) GARDARSSON - Act 5 Scene 1 - Acted and Directed at the circus in 2002
  11. (Orlando) BLOOM - Act 1 Scene 4 - Played Romeo in 2014 
  12. (Alfred) ENOCH - Act 3 Scene 1 - Played Romeo in 2021 
Just using first names, in any order, isn't enough letters for a 100 square grid. And there are too many if we include first and last. I feel like Beymer and Olivier are red herrings, but not sure how. I thought if I removed both of them I'd get down to 80 and then could use the letters on the side that I tried to anagram last night, but removing them only gets us to 91 letters. WHAT AM I MISSING? 

Back to hints. 
  • #3: Each puzzle, not the solutions, refers to a different scene. Yes.
  • #4:  It’s important to know when the actors performed. Also, yes. 
  • #5: No need to write anything on the seating chart. It’s just a reference. For what? A grid? Years? There aren't 100 Scenes... 
Years... the grid is 2 digits. That would give us:

  1. (Gisli Orn) GARDARSSON - Act 5 Scene 1 - Acted and Directed at the circus in '02
  2. (Orlando) BLOOM - Act 1 Scene 4 - Played Romeo in '14 
  3. (Alfred) ENOCH - Act 3 Scene 1 - Played Romeo in '21 
  4. (Leslie) HOWARD - Act 2 Scene 3 - Played Romeo in '36 
  5. (Laurence) HARVEY - Act 3 Scene 5 - Played Romeo in '54
  6. (John) STRIDE - Act 1 Scene 1 - Played Romeo in '60 
  7. (Richard) BEYMER - Act 3 Scene 2 - Played Tony in West Side Story in '61
  8. (Leonard) WHITING - Act 1 Scene 5 - Played Romeo in '68
  9. OLIVIER - Act 2 Scene 2 - Tricky. Laurence Olivier was the narrator and Lord Montague in the '68 version. 
  10. (Sean) BEAN - Act 4 Scene 3 - Played on stage in '86 
  11. (Antoni) CIMOLINO - Act 4 Scene 1 - played Romeo in '93 
  12. (Leonardo) DICAPRIO - Act 5 Scene 3 - Played Romeo in '96 
I swear if this turns out to be semaphore again I'm going to be pissed. Phew, doesn't look like it. 


A constellation? We've done star things before. Google is unhelpful. GPT tells me that the main constellations with 11 stars are Auriga, Pisces, and Cetus. Cetus looks like two rhombuses (rhombii?) connected by a chain, not seeing that here. Pisces is an L shape, which I'm also not seeing here. Auriga, the Charioteer, looks more like a teapot to me, but also not what I'm seeing here. Ok. 

How do we go back to acts and scenes at this point. Word #? Letter number? Putting it back in play order we have: 
  1. (John) STRIDE - Act 1 Scene 1 - Played Romeo in '60 - 
  2. (Orlando) BLOOM - Act 1 Scene 4 - Played Romeo in '14 
  3. (Leonard) WHITING - Act 1 Scene 5 - Played Romeo in '68
  4. OLIVIER - Act 2 Scene 2 - Tricky. Laurence Olivier was the narrator and Lord Montague in the '68 version. 
  5. (Leslie) HOWARD - Act 2 Scene 3 - Played Romeo in '36 
  6. (Alfred) ENOCH - Act 3 Scene 1 - Played Romeo in '21 
  7. (Richard) BEYMER - Act 3 Scene 2 - Played Tony in West Side Story in '61
  8. (Laurence) HARVEY - Act 3 Scene 5 - Played Romeo in '54
  9. (Antoni) CIMOLINO - Act 4 Scene 1 - played Romeo in '93 
  10. (Sean) BEAN - Act 4 Scene 3 - Played on stage in '86 
  11. (Gisli Orn) GARDARSSON - Act 5 Scene 1 - Acted and Directed at the circus in '02
  12. (Leonardo) DICAPRIO - Act 5 Scene 3 - Played Romeo in '96 
Filling in above - line# first, so:
  • Act 1 Scene 1 Line 60: one of my master’s kinsmen. More than 10 letters. 60th word? TO
  • Act 1 Scene 4 Line 14: Not I, believe me. You have dancing shoes. 14th word? WITHOUT.
    • Becoming clear that line is unlikely
    • Word also implausible.
I really need to figure the word salad on the side, but still not getting anywhere.
  • Hint #6: Ignore the first 2 digits of the year, only the last 2 digits are important. Yes. With you there. 
  • Hint #7: To solve the puzzle, find the year that each actor performed as Romeo. Yes, also there.
  • Hint #8: Order actors according to where their puzzle falls in Romeo & Juliet. Tell me something new, please
  • Hint #9: Reference the year with the seating chart to find the corresponding letter. Ugh. I am TRYING.
I am trying to go back to the anagram and getting nothing. 

Reaching out to the Discord and many many thanks to Belthazar and cp80. First/simplest change I can make - Laurence Olivier did play Romeo WAY back in the day, so that gets us:
  1. (John) STRIDE - Act 1 Scene 1 - Played Romeo in '60 - 
  2. (Orlando) BLOOM - Act 1 Scene 4 - Played Romeo in '14 
  3. (Leonard) WHITING - Act 1 Scene 5 - Played Romeo in '68
  4. (Laurence) OLIVIER - Act 2 Scene 2 - Played Romeo in '35. Updating the bingo chart as well.
  5. (Leslie) HOWARD - Act 2 Scene 3 - Played Romeo in '36 
  6. (Alfred) ENOCH - Act 3 Scene 1 - Played Romeo in '21 
  7. (Richard) BEYMER - Act 3 Scene 2 - Played Tony in West Side Story in '61
  8. (Laurence) HARVEY - Act 3 Scene 5 - Played Romeo in '54
  9. (Antoni) CIMOLINO - Act 4 Scene 1 - played Romeo in '93 
  10. (Sean) BEAN - Act 4 Scene 3 - Played on stage in '86 
  11. (Gisli Orn) GARDARSSON - Act 5 Scene 1 - Acted and Directed at the circus in '02
  12. (Leonardo) DICAPRIO - Act 5 Scene 3 - Played Romeo in '96 
Also, they told me the letters aren't an anagram, which would explain why they aren't anagraming. 

(Later) 

Took a break to feed Turkey, who's now being worn like an accessory, and took another look at the grid again. The something clicked between 'what is the purpose of the aisle' and 'what letters were you trying to anagram that don't anagram' and OMFG I WAS OVERTHINKING THIS. FFS. The aisle is to separate the letters. The letters are part of the answer, they are not anagrams. The group of five numbers corresponds to each letter on the left or right. So,
  1. 60 - S 
  2. 14 - C 
  3. 68 - O
  4. 35 - T (and this is where I realized what it was and typed it in and got it correct YAY!!!)
  5. 36 - T
  6. 21 - I 
  7. 61 - S
  8. 54 - H
  9. 93 - P
  10. 86 - L
  11. 02 - A
  12. 96 - Y
The 'Scottish Play' is MacBeth, which actors are apparently superstitious to say. I feel like an idiot for WAY overthinking. But! I solved it! Many thanks to Belthazar and others on Discord!! 


Friday, March 21, 2025

Cryptex Hunt Days 5&6

I did a bunch of the other Cryptex Hunt 2025 puzzles yesterday, didn't get around to writing them up. Today I'm going back to the Media page, starting with the puzzles, although I know I should probably dive into the Horoscopes based on the last puzzle. Alas. 

Media

Crossword

I'd seen this puzzle before, but didn't want to go to the trouble at the time of sorting it out and putting it on a separate page and all of that to solve it. Plus I could tell there was a message hidden in the words to rack up, but didn't solve it the other day. The first part, then, is to figure out what the words I need to grid into the puzzle are. 

Going through each, and with the helpful hint that they will be in alphabetical order, you realize there's an extra letter in each word. Taking the spare letters you get the message: To find the final solution of this puzzle look at the four diagonals from outside to inside. Ok, on it. Drop a screenshot of the grid into paint and away we go, using the fixed list which I ended up copying out by hand for ease of checking off. I won't bore you with the solving - just make sure that you've got the right words and they do all fit into place. 

You get four words: Granite, Soaring, Signors, Nosings

No clue what to do with that at this point. Having learned my lesson yesterday about trying to go too many steps, I put them in the solver, just in case. I get the message: This is one of the 11 sub-solutions. Keep on going. 

Phew. Ok. And looking at my notes, this presumably refers to the sub-solutions hinted at by 'Miller's Fortune': The other predictions here will guide you to eleven wordy opportunities. Make sure to purchase these opportunities without loyalty in the right order. 

So that's 4 of the 11. Time to find the rest. Though maybe I should figure out which prediction is which word? (Yes I should have done this first)

Horoscopes

  • Pisces - Feb 19-Mar 20: This is Miller's fortune, that gives us the instruction
  • Aries, Taurus, Gemini, Cancer - Mar 21-Jul 22: There are four star signs here, and it talks about filling in the emptiness, following the removed instructions, etc. I'm going to go out on a limb and say these are the hints for the crossword, which, again, got us: Granite, Soaring, Signors, Nosings
  • Leo - Jul 23 -Aug 22: This talks about filling in holes and that "a hole can be filled with different things in a row and a column. Make sure to find all holes, the ones filled with numbers, and the ones filled with letters from a murderous message." I expect this is referring to the sudoku, which I tried solving yesterday only to realize that it doesn't actually solve like a normal sudoku - which now makes sense.
  • Virgo - Aug 23-Sep 22: Ok, this is clearly referring to the word jumble "you might think you are in a jumble, but that everything is obvious. But it is not, grey areas exist, and must be ignored." Which explains why, when I solved it yesterday, it told me I was looking in the wrong place. A quick check of my notes, and a verification with the system: Noising. Is that even a word? 
  • Libra - Sep 23-Oct 22: "Set yourself a target, and soon you will achieve all nine." The target puzzle. Vintage
  • Scorpio - Oct 23-Nov 21: Discusses a cosmic symphony, nothing I've done yet has anything to do with music. Also a remote hope? Take the last row... Ok, not sure which puzzle this refers to... yet. (Later) Oh. Cosmic symphony is this puzzle put into the shopping list? Maybe?
  • Sagittarius - Nov 22-Dec 21 "Listen to the wisdom the aged would provide..." Ok, the interview with the actress, where she "sometimes forgot things".  That's where I got "find all plays quoted here in word search." The horoscope says "If you follow the missing instructions, you will be glancing off." but the message in the word search gave me "This solution was flagged as not accurate." Popping that into the solver tells me to keep going, so I'll go back to the word search after sorting these out. Skiting
  • Capricorn - Dec 22-Jan 19: Talks about revisiting the holy (hole-y?) grid, sudoku again?
  • Aquarius: Jan 20-Feb 18 - revisit what was jumbled up but then take the fifth. Fifth column of the jumble gives Migrate
I'm seeing a lot of rescrambled letters between the interim solutions. Looking at the loyalty cards shopping list and instructions, I'm guessing you go from one word to another - like NOSINGS to NOISING you add/subtract an I/S?
 

Scramble - Aquarius and Virgo

I did this one yesterday, a quick puzzle between kitten feedings, but hadn't connected it to the instructions from the Horoscopes. You can use an unscrambler, but other than Absorb, I didn't need it. You get: Denims, Exotic, Brings, Absorb, Climax, Length, and Eagles. Line them up and away you go. 

Target - Libra

 I am very bad at these, as witness my SpellingBee scores on NYT, but I will see what I can do.... (later)... I fully admit to 'cheating' on this one and using a word unscrambler. I kept trying to spell 'galivanting,' despite there not actually being all the letters present in enough quantity. The only 9-letter word that the grid spells is 'elevating'. Following the instructions, to remove the first letters ('evating') and scrambling again gives us Vintage, which is confirmed.


Word Search - Sagittarius

When I first did the word search, I followed the instructions from the interview. I didn't try to just find the words listed. Will start there and see what that gets me. Screenshot and paint to the rescue. 
(later)
Well, that didn't provide anything obvious. Time to re-find all of the plays in the word search and see what I missed. The plays are: 
  • Antony and Cleopatra
  • Romeo and Juliet
  • Measure for Measure
  • Love's Labor's Lost
  • The Winter's Tale 
  • The Comedy of Errors 
  • Much Ado About Nothing  
  • All's Well That Ends Well
That got me this. The message about being 'flagged for inaccuracy' is in grey. 


Flags make me think of semaphore, which I don't know how you get anything meaningful out of the squiggles, and they've already used it so no? Or vessel flag code, which is even more of a no. The only other thing I can think of is the phrase 'glancing off'. Makes me think of 'glancing blows' which would be here they almost hit but didn't?  

(Later)

I went and took a nap. My brain kept saying 'what if it IS semaphore despite them using it already?' Nah, roll over, try to sleep. 'but what if???' Ok, FINE. Get up, try making sense of the squiggles. Nada. Then realize that the grey bits could, theoretically, shape semaphore letters. MF. Skiting. Is that even a word?? Again?? 

Sudoku - Leo & Capricorn

(LOTS OF TIME AND MANY HINTS FROM NICE PEOPLE ON DISCORD)

I finally gave up on this one and just reverse engineered the shopping list. 

I found the murderous note and the pieces missing - it should read "Be not cracked within th(e ring mas)ters, you are all welcome". Presumably, minus a letter, "ERINGMAS" fits into the shopping list. (later) Probably after SOARING. Reverse engineering this is probably MARGINS or ARMINGS - we need to drop the O first, so SARING as the base. 

Shopping list

The final words I had were: Granite, Nosings, Soaring, Signors, Noising, Vintage, Migrate, and Skiting. With a bit of work with GPT and an Unscrambler, I figured out which groupings made the most sense. SKATING to SKITING (obviously), then there was a blank, then a group that either went NOISING-->NOSINGS-->SIGNORS-->SOARING or those words in reverse. GPT analyzed that in terms of letters, it made more sense SKITING to NOISING vs to SOARING. Looking at those two, I knew I had to drop a T and a K to get an intermediate word, which Unscrambler provided as SINKING. No idea how to get that from any of the puzzles. None. But it works. Using a similar method, I eventually had 
  1. SKATING
  2. SKITING
  3. SINKING
  4. NOISING
  5. NOSINGS
  6. SIGNORS
  7. SOARING
  8. ?
  9. ?
  10. MIGRATE
  11. GRANITE 
  12. VINTAGE
From the shopping list, it looks like you're more interested in what you subtract, so I got ATKIN(S/O)NMR - which is, of course Rowan Atkinson's character Mr. BEAN!!

Still no clue on the sudoku, but glad to be done with Media! 

Quality Theater Memes

This one was a real pest to do without printouts or trying to go through a bunch of photo editing. Then someone suggested just using a ruler on the screen. BINGO! Essentially you line up the little green boxes on the memes with text on another meme. Again, scrolling back and forth with a ruler, very chic. Each box has a highlighted capital letter, which eventually gives the message Cheers Meme Actor. Of course, my brain went to Cheers! the TV show, because old, but it's actually based on Leonardo DiCaprio, which a quick google told me. Here's your meme! And that's the last puzzle before the meta, but I'm going to take a break and feed the kitten and maybe even sleep without dreaming of semaphores and sudoku!


Monday, March 17, 2025

Cryptex Hunt, Day 4

It is, again, a beautiful day, and too pretty to just sit inside and search for jobs. I did do that, though. Applied for one, which I view as an excuse to go back to puzzling through the Cryptex Hunt. The universe paid me back for that, however, by destroying my childhood with the first one. 

Blog: Spotlight on Blocking

This puzzle looks like it should be easy enough. It gives a small intro, talking about overlapping lights for the play. Then it gives you a series of eight groups of six dots. Your brain immediately goes, correctly, to braille, and to trying to sort out the colors into groups. And here is where my childhood was destroyed. 

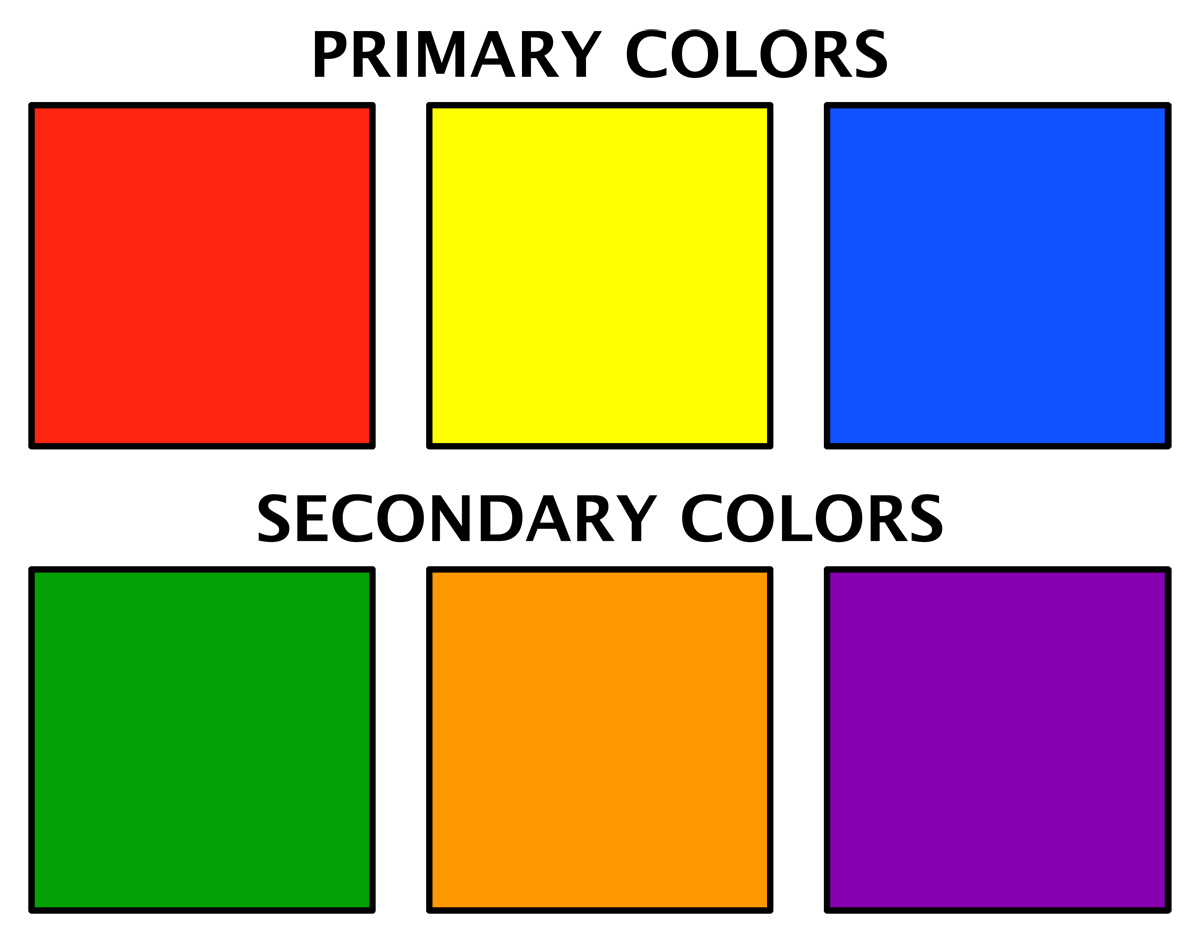
See, growing up, I learned that the three primary colors are Red, Blue, and Yellow, which combine to make Purple, Orange, and Green. 

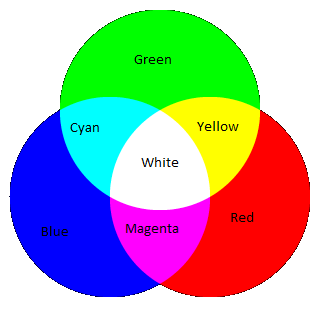
However, this does not work. And it is very frustrating. I knew I was on the right track, as I started with Red, and the first four blocks gave me something useful - THE X (where X is either a new word or a break). And then gibberish. None of it made sense. And then I caved and got a hint. Color theory, apparently, for lights, is different. 
Here, the core colors are Red, Green, and Blue, which all combine to make White. The one that really throws me off is that Red and Green combine to make Yellow. I had to go back multiple times to my grid and fix that, because I really want yellow and blue to combine to make green. Orange is nowhere to be found. However, once I got that sorted out, the colors of the blocks do combine to make a sentence. Solving that sentence, which has nothing to do with Shakespeare, unfortunately, gets you the answer to this puzzle. And a headache. Red + Green = Yellow is destroying my worldview. Time for more coffee. 

Blog: Table Read Chaos

I should thank my mom and her obsession with the stars for the easy start on this one. What took the longest was mapping out the names around the table to begin with. Seeing 12 places, I thought initially of a clock, but the helper text I know that we’re all stars here, so let’s come together to create a beautiful production set me straight quickly. Essentially, map the folks around the table, then trace the path of the conversation to get a constellation. Bolded words aren't necessary but are good for confirmation. Then, take the letter in the position of the number of stars (4 stars, 4th letter) of that constellation to get a word. I didn't recognize the first one off the bat, but knew I had it when the second constellation was one of the first ones I was taught to recognize. The rest of the puzzle was straightforward, but, again, gave you a word that does not have a direct link, as far as I'm aware, with Shakespeare.  


Sunday, March 16, 2025

2025 Cryptex Hunt, Day Three

One of the many reasons I don’t normally finish Cryptex Hunts is because life gets in the way. That is definitely true this time around as well. Still, today is a lovely day, too lovely to be stressing out and worrying about finding a new job, so I am sitting here in the shade with a light breeze and doing puzzles. 

Blog: Script Scribbles

This one had me stumped for ages, and still does to some extent. It consists of a fight scene from Romeo and Juliet, with a grid at the top and a series of letters in various shapes at the bottom. Some of the blocks in the grid are highlighted, so it makes sense that you are going to try to fit the blocks of letters into the grid. Except, at first, you can’t. There are configurations that simply do not work. I tried turning the grid on its side, rotating the blocks of letters, nada. Eventually, I checked the Discord, and got the hint that the grid itself isn’t the answer, it’s a HINT to the answer, and that while yes, you do need to fit blocks into the grid, not all blocks, and some can be used multiple times. OK, fine. With that hint it took me a minute or two only to fit the blocks that I could into the grid, so that the shaded blocks spelled SEMAPHORE. 

Ok, so the letter blocks are to be drawn as semaphore shapes, makes total sense. Until you realize that there is a lot of room for interpretation there. I’m still stuck on this one, and the copious hints on the Discord re de-coding and en-coding aren’t making much sense to me. Trying another puzzle to come back to this one.

ETA: One of the reasons I am sleep deprived is I have a new foster kitten, Turkey. He's just barely a week old now, and weighs only 7 oz, which means I'm awake every 2.5 hours or so to feed him. The solution to this bloody puzzle came to me at our 3 am feeding, because of course it was bothering me. The letters aren't only useful to spell out semaphore, they are part of the semaphore. Got out grid paper this morning, after a double shot latte, to sort out the answer itself. Ain't nothin' gonna breaka my stride, ain't nothing gonna slow me dow-wn, oh no, I've got to keep on... SOLVIN'

Cast & Crew

Admittedly I had no idea where to start on this one. I tried messing with the names of the characters, trying to merge the houses as it were, nothing. Then the Discord hinted I was probably looking at the wrong line of the intro text. Looking, I realized it was all about their journeys. So, I got out my handy map app, and mapped their journeys and what do you know, going west to east, they spell out a word. Huzzah for one I could wrap my admittedly sleep-deprived brain around! 


Saturday, March 8, 2025

2025 Cryptex Hunt, Day Two

Let's dive in

Blog: Friar's Fumbles

You know it's a good sign when you wake up in the middle of the night and figure out one of the puzzles that was bothering you because you knew you were close. The puzzle is the Friar's speech to Juliet: here, take this nasty potion, you'll fake death, I'll totally make sure Romeo finds out in time to be there when you wake up, what could go wrong...? Of course, there are errors in the puzzle version, all numbers. My brain tried to make it binary (it's not), and then I got distracted by the other puzzles. I of course came back to it in the middle of the night, figured out the issue, and then solved it this morning. It's Roman numerals. IVX, etc. The answer it gives at first seemed like gibberish to me, but it turns out to be the name of a famous Shakespearean director. Shows what I know. ;) 

Friday, March 7, 2025

2025 Cryptex Hunt, Day One

First, I should admit straight off that I have never, ever, ever solved a full Cryptex Hunt. I routinely get super excited, join the Discord, do a puzzle or two, and then real life intervenes and I drop off. This time, however, life being what it is, I figure I have plenty of time to both do the puzzles, and journal about it. Of course, I made this decision AFTER completing a few puzzles and realizing that I should probably take notes, so, bear with me. 

The 2025 Cryptex Hunt is set up around a play, primarily a play's website, and the play in question is Romeo and Juliet. There appear to be both straightforward one-off puzzles, such as the 'blog' entries, and more complex, multifaceted puzzles, like the Media page. 

So far, I've solved one blog entry - prop pieces - and a few of the media articles which seem to tell a story. 

Blog: Prop Hunt

This was pretty straightforward - you need to take two words and smush them together, placing one inside the other, to get the list of items the prop master needed. The items needed were described in the list, but the words to combine were images. Again, straightforward but what took the most time was that I don't have a printer, and was flipping back and forth between the pdf's and making pdf checkmarks so I didn't miss any words. I found it a lot easier to determine the word first then figure out which pictures combined to make it than the other way around but YMMV. Once you figured out all the words, following the prop master's guidance you took the middle letter, which gave you another phrase, which told you to combine another two words to get your answer. 

Media

This one is clearly a multifaceted puzzle, framed as the daily newspaper, and I'm too tired to completely solve it tonight. Each article appears to be its own puzzle, resulting, so far, in a phrase.

PM Chris and Wife Tammy Killed

This is the first big article, discussing several unexplained deaths, possibly involving poison and/or daggers. Three different possibilities for how Mr. Chris Dorn, Prime Minister of Cryptexhuntia, died. Here, as you read you come across reversed words and sections of words, and because your brain subconsciously autocorrects it may take a couple readthroughs to find them all. Eventually, you get  "Millers future describes the solution." The 'Miller' in question is, presumably, 'Ian Miller,' one of the deceased, so not exactly a bright future there. I should note, however, that there is a section of the 'Media' section entirely devoted to horoscopes, and the deceased were all together to celebrate his birthday on March 6th, which would make him a Pisces. 

The Pisces horoscope reads: Pisces, Feb 19-Mar 20. As the vivacious and adaptable sign of the zodiac, the celestial energies are aligning to bring a burst of dynamic opportunities and intellectual stimulation into your life. The other predictions here will guide you to eleven wordy opportunities. Make sure to purchase these opportunities without loyalty in the right order.

I didn't go any farther with the Horoscope puzzle this evening, and the 'purchase without loyalty' presumably refers to the other article regarding the hidden costs of loyalty cards. 

Interview with Tanja Kennedy 

This is the second full length article, a chat with the actress playing the Nurse, who so very clearly wants to play Juliet (again). She looks close to my age, probably not the best choice for a teenage idiot. Not going to let that stop her, though. What may really have gotten her placed in a part with fewer lines, though, is her habit of dropping key words from Shakespearean quotes. The first quote is very clearly missing a word, and if you compare them to the original text (Cryptex Hunt very helpfully sends you to the Folger Shakespeare Library so you know you're all using the same version) you get a phrase: find all plays quoted here in word search. Ok, simple enough. Except, oh wait... Clearly the Cryptex Hunt folks are fans of the NYT Games section, as they've bent the play titles all out of shape. For this, I found it easier to take a screenshot, then use the paint app to black out each letter individually. Eventually, you get yet another message: This solution was flagged as not accurate. That's not particularly helpful. Which solution? Miller's future, which I haven't solved yet, or another proposed solution? Presumably something else points here to get us the full story, but it is late, and I must sleep.